To make the towels, I was inspired by a tutorial I found here at the SewMamaSew blog.
To make the oven mitt, I found a tutorial here. However, there were some changes that I needed to make.
1/3 Insul-Bright insulated lining
1/3 yard of cotton batting
1/3 yard of exterior fabric
1/3 yard of lining fabric
Making the pot holders was fairly easy.Here is what you'll need to make this pot holder...
- Scraps of various fabrics. I used 5 different color fabrics for the log cabin pattern on the front. One color on the back and one color for the binding. Here are the fabric measurements for this project.
Cherry fabric: 2"x2"
Green fabric: 2"x2", 2"x 4"
Red fabric: 2"x 6", 2"x 8"
Black polkadot: 2"x4", 2"x 10"
White fabric: 2"x 6", 2" x 8"
Backing, Insul-Bright and cotton batting: 10"x10"
Binding: 2 1/2" stripes 10" long
Pot holder loop: 2 1/2" x 6" strip (optional)
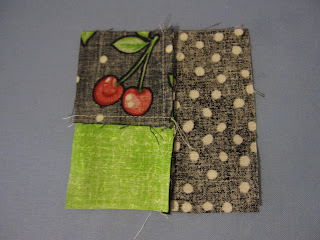
First take your two squares and sew them together using a 1/4" seam.
Next, iron the seam on top of the green fabric. This will help when it comes time to quilt the pot holder. Whatever you do, don't iron your seams open, this will make your life incredibly difficult.
Line up the next fabric with what you have sewn so far. Sew the fabric together on the right.
Cut off any excess fabric.
Iron the seam you just sewed to the right side. Your seams should be on top of the new fabric piece.
Add the next piece of fabric on top to what you've sewn. Iron the seams up so they are on top of the new fabric you just added. This is what you should have so far.
Take your next piece of fabric and iron your seams to the left so they are on top of the new fabric added to the pattern.
This is what your pot holder should look like so far.
Keep adding fabric stripes and ironing the seams down so they are on top of the new strip added.
Now your log cabin block is completed! Let's start putting layering! Add the cotton batting underneath the block.
You should have 4 layers in the following order: top, cotton batting, Insul-Bright, and pot holder back facing down. Make sure when you layer your Insul-bight lining that the shiny side of the batting is facing down towards the pot holder backing. According to the Insul-Bright directions, "The shiny side of your Insul-Bright should face the hot or cold item allowing it to reflect the energy back to its source."
Pin your layers together so you have a pot holder sandwich.
Next I switched my presser foot over to my walking foot. A walking foot prevents the top layer of fabric from shifting by moving it under the needle at the same rate as the machine's feed dogs are moving the bottom layer, preventing puckering and pleating of the layers. It is a handy tool to have when you sew together multi-layers of a fabric such as a quilt or a pot holder.
Now we are going to stitch in the ditch. This is when you stitch right next to the seam allowance. This is also why you ironed your seam allowance to one side.
You will stitch two squares.
Start at one corner of the middle square and have your needle follow right along side the seam. You will want to sew as straight as possible so the stitching will be hidden. Don't rush this process, take your time!
Outline the middle square. When you are done, outline the next biggest square using the same method.
Yay! you are done quilting your pot holder! Cut off any excess fabric that remains around the edges.
Now let's add a binding. I opted to not use a continuous quilt binding for my pot holders because I didn't want to do any hand stitching. I call this "lazy man's binding".
Take two of your 2 1/2" stripes. Fold them in half and iron.
Take one strip and lay it on top of your pot holder. Raw edges should line up. Sew using a 3/8" seam allowance.
Next, fold the binding over the raw edge and pin pin pin that binding to the pot holder!
Now we will keep practicing stitching in the ditch. Stitch in the ditch along the binding seam line on the pot holder top. As you stitch, you want to catch the outer edge of the binding at the back of the pot holder. Remove pins as you approach them. Trim off any excess fabric on the ends.
Repeat these binding steps on the opposite side on the pot holder.
You have two sides left of your pot holder. Take one binding strip and line it up just like you did the previous ones. This time, take the raw edges and fold them in. Sew the binding to the pot holder.
Fold the binding over the raw edge of the pot holder. It will also fold over the raw ends of your binding. Pin then stitch in the ditch. Do this for the final side as well.
Your pot holder is now complete!
After I made my pot holders I decided I needed to add a loop. Take a 2 1/2" x 6" strip and fold it in half. Iron. Open it up. Take one raw edge and fold it into the middle so it lines up with the middle crease. Iron. Do the same thing for the other raw edge. When both raw edges line up with the middle crease, fold in half and iron. Use a 1/8" seam allowance and stitch both sides of the strip.
Pick a corner of your pot holder that you would like to add the loop. Fold both ends under 1/2"-1" on both sides of the pot holder. Hand stitch in place. Congratulations! Now your pot holder is completed with an added loop!


No comments:
Post a Comment